
Let’s dive into Part 1: Getting Started with CUDA Programming — a hands-on, technical tutorial that takes you from setup to running your first GPU kernel.
🚀 Part 1: Getting Started with CUDA Programming
🎯 Objective
By the end of this tutorial, you’ll:
- Understand the CUDA programming model
- Set up your development environment
- Write, compile, and run your first CUDA program
- Learn how CPU (host) and GPU (device) cooperate
🧠 1. What is CUDA?
CUDA (Compute Unified Device Architecture) is NVIDIA’s platform for parallel programming on GPUs. It allows developers to write programs that offload computationally heavy tasks to the GPU while keeping control logic on the CPU.
| Component | Role |
|---|---|
| Host (CPU) | Runs the main program, manages memory, launches GPU kernels |
| Device (GPU) | Executes data-parallel tasks in thousands of lightweight threads |
⚙️ 2. Setting Up the Environment
Requirements
- NVIDIA GPU with CUDA support
- Linux, macOS (limited), or Windows
- CUDA Toolkit (includes compiler
nvcc, libraries, and samples)
Installation (Ubuntu example)
1# Update packages
2sudo apt update && sudo apt upgrade -y
3
4# Install CUDA Toolkit
5sudo apt install nvidia-cuda-toolkit -y
6
7# Verify CUDA installation
8nvcc --version
Expected output:
Cuda compilation tools, release 12.x, V12.x.xIf you’re using Windows, install from: 👉 https://developer.nvidia.com/cuda-downloads
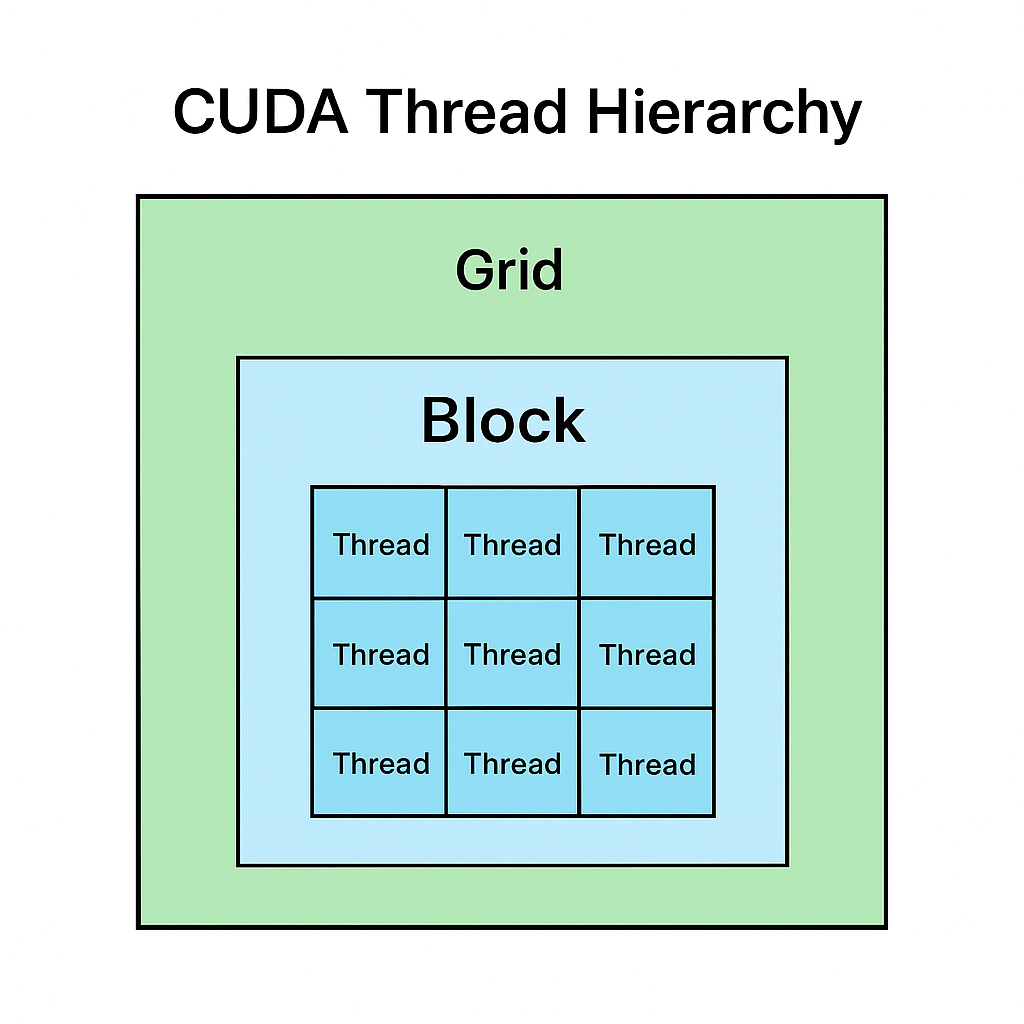
🧩 3. The CUDA Programming Model
CUDA divides work hierarchically:
- Grid → Contains multiple Blocks
- Block → Contains multiple Threads
- Thread → Executes one instance of the kernel
🧠 Think of it like this:
A classroom (Grid) has many groups (Blocks), and each student (Thread) solves part of the problem.
💻 4. Your First CUDA Program: Vector Addition
We’ll add two arrays (A and B) on the GPU and store results in C.
File: vector_add.cu
1#include <iostream>
2#include <cuda_runtime.h>
3
4__global__ void vectorAdd(const float *A, const float *B, float *C, int N) {
5    int i = blockDim.x * blockIdx.x + threadIdx.x;
6    if (i < N) {
7        C[i] = A[i] + B[i];
8    }
9}
10
11int main() {
12    int N = 1 << 20; // 1M elements
13    size_t size = N * sizeof(float);
14
15    // Allocate host memory
16    float *h_A = (float*)malloc(size);
17    float *h_B = (float*)malloc(size);
18    float *h_C = (float*)malloc(size);
19
20    // Initialize input data
21    for (int i = 0; i < N; i++) {
22        h_A[i] = i * 0.5f;
23        h_B[i] = i * 2.0f;
24    }
25
26    // Allocate device memory
27    float *d_A, *d_B, *d_C;
28    cudaMalloc(&d_A, size);
29    cudaMalloc(&d_B, size);
30    cudaMalloc(&d_C, size);
31
32    // Copy data from host to device
33    cudaMemcpy(d_A, h_A, size, cudaMemcpyHostToDevice);
34    cudaMemcpy(d_B, h_B, size, cudaMemcpyHostToDevice);
35
36    // Launch kernel (1024 threads per block)
37    int threadsPerBlock = 1024;
38    int blocksPerGrid = (N + threadsPerBlock - 1) / threadsPerBlock;
39    vectorAdd<<<blocksPerGrid, threadsPerBlock>>>(d_A, d_B, d_C, N);
40
41    // Copy result back to host
42    cudaMemcpy(h_C, d_C, size, cudaMemcpyDeviceToHost);
43
44    // Verify result
45    for (int i = 0; i < 5; i++) {
46        std::cout << "C[" << i << "] = " << h_C[i] << std::endl;
47    }
48
49    // Free memory
50    cudaFree(d_A);
51    cudaFree(d_B);
52    cudaFree(d_C);
53    free(h_A);
54    free(h_B);
55    free(h_C);
56
57    return 0;
58}
🧮 5. Compile and Run
1nvcc vector_add.cu -o vector_add
2./vector_add
Expected output:
1C[0] = 0
2C[1] = 2.5
3C[2] = 5
4C[3] = 7.5
5C[4] = 10
✅ Congratulations — you just executed your first CUDA kernel!
🔍 6. Understanding the Kernel Launch
vectorAdd<<<blocksPerGrid, threadsPerBlock>>>(d_A, d_B, d_C, N);This line tells the GPU:
- Launch
blocksPerGridblocks - Each block contains
threadsPerBlockthreads - Each thread computes one element in the array
🧠 7. Key Concepts Recap
| Concept | Description |
|---|---|
__global__ | Marks a function as a CUDA kernel (runs on GPU) |
cudaMalloc | Allocates memory on GPU |
cudaMemcpy | Transfers data between CPU and GPU |
<<<grid, block>>> | Kernel launch syntax |
| Thread indexing | blockIdx.x, threadIdx.x, blockDim.x help calculate thread IDs |
🧩 8. What’s Next?
In Part 2: Threads, Blocks, and Grids, we’ll:
- Dive deeper into parallel execution
- Visualize how threads cooperate
- Implement element-wise vector multiplication
- Learn performance tuning using block sizes
CUDA Thread Hierarchy